
Increase your server security by configuring the login to using SSH key-pair authentication. Key authentication allows for an automated encrypted login procedure which can be used across SSH servers. No more remembering passwords, just one public and one private key to manage your login(s). All more secure than those long and complicated passwords.
So let’s get rid of that password authentication and start configuring SSH key-pair authentication.
Generate a key pair
First step is to generate the key pair. To generate the key pair, enter the following command at the terminal:

Hit enter to accept the path:

Next you are prompted to enter a passphrase as an additional security for your key. You have the option to enter one or leave it blank.

If you leave the passphrase blank, you will not be prompted for a passphrase when you log in using the key. If you entered a passphrase, you need both the key and the passphrase to log in which makes the key even more secure.
When everything is successful, you should see the following outcome:
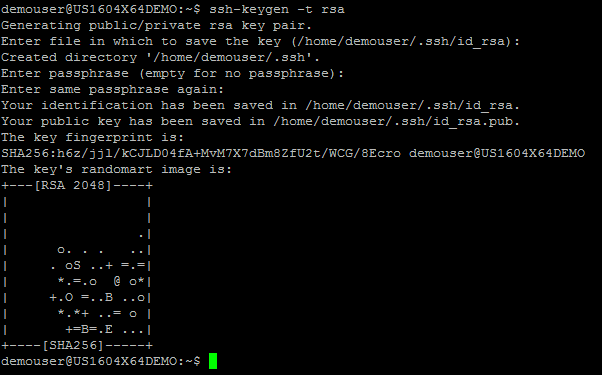
This generated a private key id_rsa and a public key id_rsa.pub in the .ssh directory of your logged in user’s home directory.

Install the public key
Next step is to install the public key onto the server. The easiest way to do this is to run ssh-copy-id.
Type ssh-copy-id followed by the user for which you want to use the key, an @ sign and the server’s ip:

An authentication message will appear prompting if you want to continue connecting. Type yes and press enter.

Now enter the password of the specified user in the ssh-copy-id command.

If everything is ok, you should get the following message:

If you log onto the server, go to the user’s home directory and into the directory .ssh, you should see 2 files called authorized_keys and known_hosts.

SSH Key-Pair Authentication from Windows Client (Putty)
Transfer the private key to your Windows client first. My preference is to use WinSCP.
Navigate to the location where the private key (id_rsa) is located and download it to your computer.

Convert your private key for use with Putty
Open PuTTYgen to convert the private key.

Click on “Load” and select the private key (id_rsa).
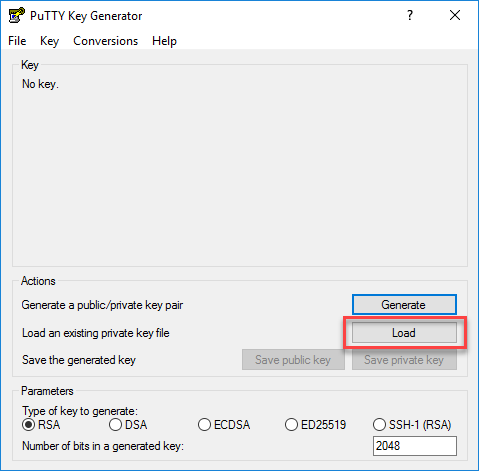
If you set a passphrase, enter the passphrase and click on OK.

If the conversion is successful, the following message will appear:

Now save your converted private key with a .ppk extension so it can be used by Putty.


Load your private key in Putty
Open Putty, fill in your host name or IP and select SSH.
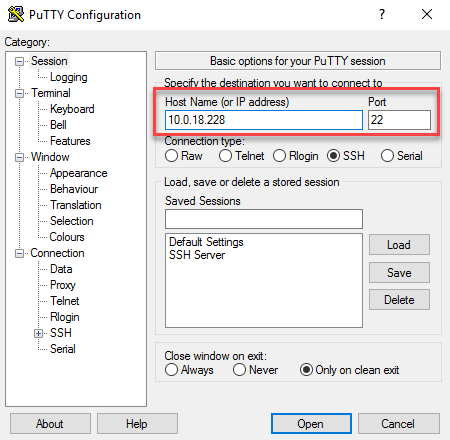
Go to Connection -> Data and specify the username in the Auto-login username field.

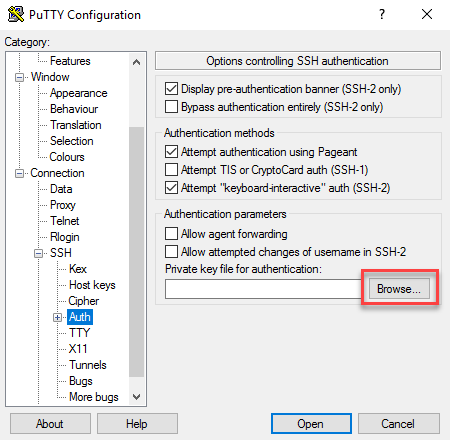
Go to Connection -> SSH -> Auth, click on Browse and select your private key (file with the .ppk extension).
For convenience, save your configuration.
When everything is setup correctly, you should get the following message when connecting:
If you setup a passphrase, enter it here and press enter.

Congratulations, you have successfully configured SSH Key-Pair Authentication!

Disable password authentication
Now that we setup the SSH keys and use them to log in, we can disable password-only authentication. This way you increase security by restricting SSH access to your server with SSH keys only.
Log in as root or with a sudo user and open the SSH deamon configuration.

Find the line that specifies PasswordAuthentication, uncomment it by deleting the preceding # and change its value to “no“.

There are two other settings that are important for key-only authentication. Make sure you check them before saving and closing the file.

Now save the file and close it (CTRL + X, then Y and Enter)
Reload the SSH deamon:

You have now disabled password authentication. From now on, your server is only accessible with SSH key authentication.
When you try to log in using password authentication, you get the following message:

