When you just installed the UniFi controller and navigate to the web interface, you will get a notification that “Your connection is not private”. This is generated because on installation, the UniFi controller will setup a self-signed certificate. In this tutorial, we will change self-signed certificate with a certificate issued by a Certificate Authority.
In short, we will turn this:

Into this:

If you have not installed the UniFi controller yet, I suggest you start by reading my tutorial about the installation first.
Generate the CSR file
First, SSH into your server and go to the UniFi directory.
cd /usr/lib/unifi
Be aware that the directory contains some symbolic links which means UniFi data is actually stored on different locations. To see the symbolic links and where they point to, type:
ls -alh
drwxr-xr-x  7 root root 4.0K Oct 16 11:30 .
drwxr-xr-x 59 root root 4.0K Oct  6 16:19 ..
drwxr-xr-x  2 root root 4.0K Oct 16 11:30 bin
lrwxrwxrwx  1 root root   14 Oct 16 11:30 data -> /var/lib/unifi
drwxr-xr-x  3 root root 4.0K Oct  6 16:19 dl
drwxr-xr-x  3 root root  12K Oct 16 11:29 lib
lrwxrwxrwx  1 root root   14 Oct 16 11:30 logs -> /var/log/unifi
lrwxrwxrwx  1 root root   14 Oct 16 11:30 run -> /var/run/unifi
drwxr-xr-x  3 root root 4.0K Oct 16 11:29 webapps
drwxr-xr-x  3 root root 4.0K Oct 16 11:30 work
Now we need to generate a certificate for our domain. To do this, run the command:
sudo java -jar lib/ace.jar new_cert unifi.mydomain.com "My Company Name" City State CC
Replace the following with your own information:
- unifi.mydomain.com: this will be your domain for which you are installing the certificate.
- My Company Name: type your company name here.
- City: change this to the city where your company is located.
- State: change this to the state where your company is located.
- CC: this needs to be changed to the 2 letter country code where your company is located f.e. US (for United States), FR (for France), etc.
Upon successful generation of the CSR, you should see the following message:
Certificate for unifi.mydomain.com generated
To check, go to the data directory (symbolic link) by typing:
cd data
ls -alh
or go to /var/lib/unifi.
Note: if you get the message “Permission denied”, you can change to root and try again. To change to root, type:
sudo -i
cd /usr/lib/unifi/data
ls -alh
drwx------  6 root root 4.0K Oct 22 11:09 .
drwxr-xr-x 44 root root 4.0K Oct  6 16:19 ..
drwx------  3 root root 4.0K Oct 16 11:30 backup
drwx------  3 root root 4.0K Oct 17 16:34 db
drwx------  3 root root 4.0K Oct  6 16:19 dl
-rw-------  1 root root  13K Oct 21 16:35 firmware.json
-rw-------  1 root root 2.3K Oct 22 11:09 keystore
drwx------  3 root root 4.0K Oct  6 16:19 sites
-rw-------  1 root root 1.2K Oct 22 01:00 system.properties
-rw-------  1 root root  718 Oct 22 11:09 unifi_certificate.csr.der
-rw-------  1 root root 1.1K Oct 22 11:09 unifi_certificate.csr.pem
Next we are going to focus on the unifi_certificate.csr.pem file. To get the certificate signing request (CSR), type:
more unifi_certificate.csr.pem
-----BEGIN CERTIFICATE REQUEST-----
MIIC3TCCAcUCAQAwgZkxCzAJBgNVBAYTAlVTMR4wHAYDVQQIExVub25vZnlvdXJidXNpbmVzc3N0
YW4xEjAQBgNVBAcTCWNoYWNhbWFjYTEYMBYGA1UEChMPTXkgZmFrZSBjb21wYW55MR0wGwYDVQQL
ExR1bmlmaS50ZXN0ZG9tYWluLmNvbTEdMBsGA1UEAxMUdW5pZmkudGVzdGRvbWFpbi5jb20wggEi
MA0GCSqGSIb3DQEBAQUAA4IBDwAwggEKAoIBAQC7Is7eO2bdM1NAKuZ7gmDmD2ntRDdfrFxi8dPL
rG+xSJJAlUdYoUu+dIQFpWC5qhC0MbqL2aFxVPVDmSbxWck/0sKa0KfFzlF1A/Klbj8mYKSDkZ7q
19N1c3b18sFEiTOI8m6a2RWqzIspFcoJpUNtR8F8cAjYBwzbzysIxzSJhucKGvfiSJ9PhHf8+NXf
rtKUNsON1mwXtV+9Ve5TftrW19zrTCBA+oC68rD9janRUFlFCwkRn8E9wmFTH4Lrt9SiL5mI6NKe
gH2JDxn/61mjlE5u261ufqNaVpulAWs45FGZK4P8P1HrA2O6x4GPOwnJyvGJvse9pko6NUPcB0RJ
AgMBAAEwDQYJKoZIhvcNAQELBQADggEBAJCSSiZRNKarkfe6OR2evGEgM979C4tyyS3DMZ7C4Jt7
nCjrNOPRdE0NQKwZ8TX4HKg4xOhriEs1kREGYOV22HSzZdvR1OdP1bE1aCTWJMMwszZSCsxQvBhe
8rw0i6F8BTT/bu9w1LM/HDu6eAwX/G09Pv9QLCs1G05r6Q15NRHNdZjSNz2n6SEoRnwvcEuBjCXQ
DLCu2pTff74ozd5sX9JrtzukmzBqsXUNZJxJNtWfkaIrsXBA7xwmG+FN6p53Lf51Jy5LEgC87F8J
OhN+3LoQez7cPxdFvXdkedBLBhOL7ZH1HI+gu2FpXZTixNvdjFHlh9s3gVQ/G93uj3V1sQw=
-----END CERTIFICATE REQUEST-----
Note: don’t worry, the certificate signing request above is a dummy generated for this tutorial! 😉
Get a valid certificate for a Certificate Authority
It’s up to you which company you want to use but for this tutorial I will be using the Positive SSL certificate from SSLs.com.

Now log in to your account and go to “Purchased certs”.
Look for the certificate you want to use and click on the button under “Status”. If this is a new certificate, it will say “Activate”. If you are re-installing the certificate, it will say “Active”.
In my case I am re-installing the certificate so I have to click on “Active” and then “Reissue (new private key)”.

Now enter the copied CSR (Certificate Signing Request) information in the text field below and click on “READ MY CSR”.

Check your certificate information and if everything looks good, click on “LOOKS GOOD, ONWARD”.
For this certificate keep “ANY OTHER SERVER (EX.APACHE)” selected.

Next screen displays some information about what the SSL certificate will cover. Just click on “ONWARD” to go to the next screen.
Now you need to confirm that you own the domain. To do so, first select “RECEIVE AN EMAIL”. Next, select an email from the list on which you want to receive your certificate.
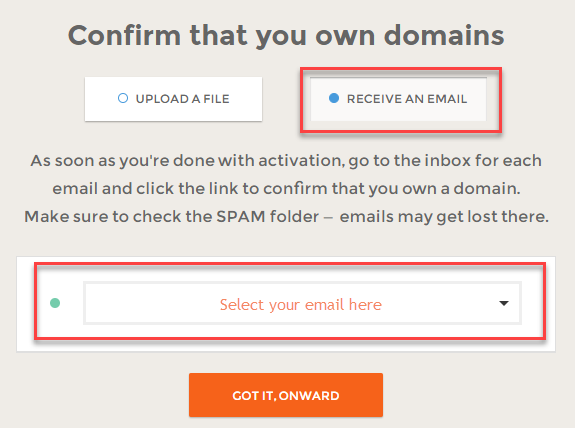
Click on “GOT IT, ONWARD”.
Before you will actually get an email, check your company contact information and if everything seems to be OK, click on “ONWARD”.
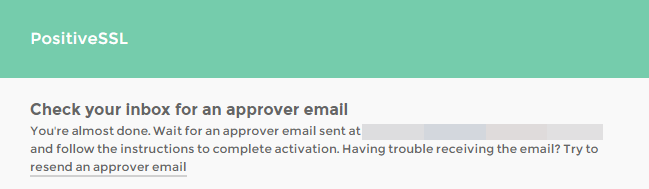
By now, you should have gotten an email to perform some Domain Control Validation for your domain.
Click on the link included in the email. This will take you to webpage where you need to fill in a validation code.
The validation code is in the email. Copy paste it into the input field and click on “Next”.

If you entered the correct validation code, your domain is validated and you should see a thank you message. In a short while you should get another email with the actual certificate we need to install.

Go to your email client, open the received email and download the .zip file with the certificate. If you did not get an email, check your SPAM folder!
Install the certificate
When you open up the zip file you should see 4 files. 3 intermediary files and the actual certificate for the UniFi controller.

Upload the certificate files to the server
Now let’s upload the files to the server. To do this I’m using WinSCP.
Upload the files to your home folder. I’ve just uploaded the folder extracted from the zip file.

Import the certificate
Go to your home folder and navigate to where you uploaded the files.
cd ~
Copy the files to the UniFi directory.
sudo cp * /usr/lib/unifi
cd /usr/lib/unifi
Import the certificate into UniFi. Don’t forget to change unifi_mydomain_com.crt with your actual generated certificate. Look at the contents of the zip file to know the actual name.
sudo java -jar lib/ace.jar import_cert unifi_mydomain_com.crt COMODORSADomainValidationSecureServerCA.crt COMODORSAAddTrustCA.crt AddTrustExternalCARoot.crt
parse COMODORSADomainValidationSecureServerCA.crt (PEM, 1 certs): CN=COMODO RSA Domain Validation Secure Server CA
parse COMODORSAAddTrustCA.crt (PEM, 1 certs): CN=COMODO RSA Certification Authority
parse AddTrustExternalCARoot.crt (PEM, 1 certs): CN=AddTrust External CA Root
parse unifi_mydomain_com.crt (PEM, 1 certs): CN=unifi.mydomain.com
Importing signed cert[unifi.mydomain.com]
... issued by [CN=COMODO RSA Domain Validation Secure Server CA]
... issued by [CN=COMODO RSA Certification Authority]
... issued by [CN=AddTrust External CA Root]
Certificates successfuly imported. Please restart the UniFi Controller.
So now we need to restart the UniFi Controller.
sudo service unifi restart
Reload the browser
If you now browse to the UniFi Controller web interface using your preferred webbrowser, you should see your valid certificate.
Congratulations, you just installed an SSL certificate with your UniFi controller!
