
How to install patches onto your ESXi 6.5 host and update it to the latest version? Take a look at this tutorial where i’m showing step by step what you need to do.
Prepare you host for patching
Find the current build
First thing we need to do is prepare our host for patching. To do this, log in to the intance you which to patch (This tutorial will not explain the process from within the vCenter Server but is very similar).
For reference, remember the current build. You can check the current build by clicking on “Host” in the left menu. The “Host” page is also loaded as default when you log in. Now look for the build number and write it down.

Download patches from VMware
When you know your current build, you know which patches to download.
Go to the VMware website, select your ESXi version and search for the applicable patches.
https://my.vmware.com/group/vmware/patch#search

Download all the patches with a higher build number than your current build.
Upload patches to your datastore
When you have all the required patches, you need to upload them to your datastore. There are 2 ways you can do this. Use WinSCP to connect to your host and upload them into the correct directory or use the upload functionality in the Datastore browser.
Datastore browser
Go to Storage (left menu) > Datastore browser

If you have multiple datastore, select the correct datastore in the left column.
The Datastore browser allows you to upload files directly from your webbrowser. The difference with WinSCP is that you have to upload each file individually while you can drag and drop all of them at the same time using WinSCP.
For ease of mind, it is recommended to create a separate directory to store your patches.
Entering maintenance mode
Bring the host into maintenance mode but first make sure you power down all the virtual machines currently running.
Go to Hosts (Left menu) > Actions > Enter maintenance mode

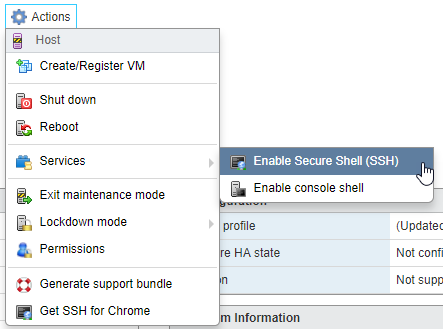
Enable Secure Shell (SSH)
We are going to use PuTTY for installing the patches. To access the host, we have to enable SSH.
Go to Hosts (Left menu) > Actions > Services > Enable Secure Shell (SSH)
Installing patches
Using esxcli
With SSH enabled, we can now connect to our host using PuTTY.
When connected, use the esxcli command to install the patches. Start with the patch with the lowest number and work your way up!
Note: remember to reboot the host after every patch you install!
esxcli software vib install -d /vmfs/volumes/<your datastore>/<directory where you uploaded the files>/<name of the patch file>.zip
- <your datastore>: enter the name of the datastore where you uploaded the patches.
- <directory where you uploaded the files>: if you placed your patches into a specific directory, enter the directory name here.
- <name of the patch file>: enter the name of the patch file you want to apply. Remember to start with the lowest number and work your way up.
If you don’t know the name of your datastore, the directory or the name of the file, use the “ls” command to look into the directory. Use the “cd” command to get into a directory.
Wait until the patch is installed, this can take a while depending on your host. This cursor in PuTTY might be blinking for a while looking like nothing is happening. Just wait patiently, it is working in the background.
Reboot host
When the patch is installed, you need to reboot the host. To do this, type the following command:
reboot now
Verify build
When the host is rebooted, verify the build has been updated. Go to the Hosts page (left menu) and look for the current build number:
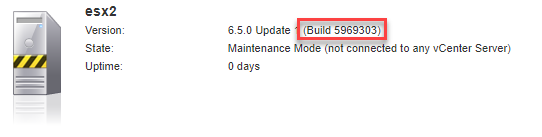
Your host should still be in maintenance mode.
Note: when you need to install additional patches, repeat the process starting from “Enable Secure Shell (SSH)”.
Clean up
Exit maintenance mode
If you are done, clean up by exiting maintenance mode so you can restart your virtual machines.
Go to Hosts (Left menu) > Actions > Exit maintenance mode

